Here’s a quick guide to disabling startup items in windows, typically used to free up memory or identifying programs/tasks that are causing problems with computer – such as viruses and trojans.
If you are reading this guide because you want to get rid of an item that is causing problems with your PC, I would strongly suggest scanning your PC for viruses and adware/malware first. Any such items found will be removed automatically.
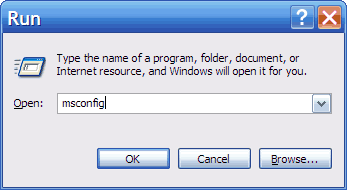
To look at all the startup items, click on start>run and type in the window that comes up msconfig (as shown below):

You should see a window with a few tabs across the top. I won’t bother explaining them all as for 99% of the time, you will not need to change anything.
Click on the startup tab, and the following window should come up:

Looks a bit daunting, but all that is required is to identify each item, and if the name isn’t enough to give you a bit of a clue, go here and put the name of the item in to see what it relates to.
To disable any items, just deselect the check box to the left of the respective item. Note: this will not remove it, so if so desired, it can be included at a later date.
Once you are satisfied with your (de)selections, click OK and you will then be prompted to restart the computer. That’s all it takes!